A short introduction to the MVVM-C design pattern.
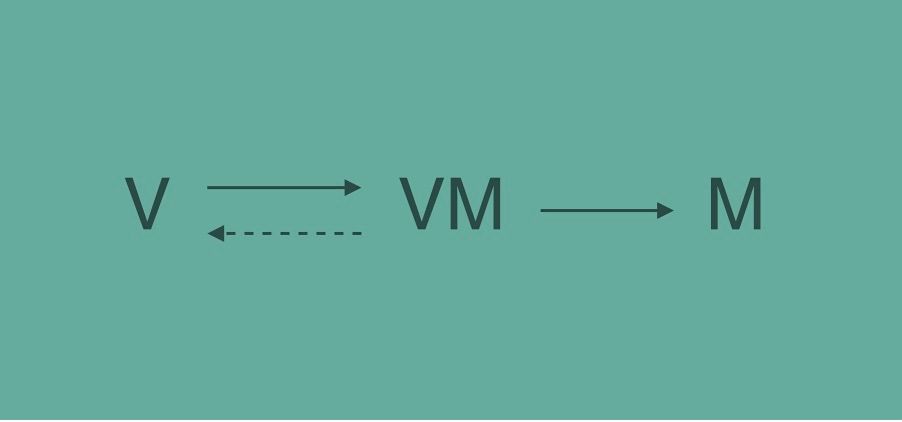
When thinking about design patterns and architectures in iOS development, MVC might be the first thing that comes to mind for most of you. But throughout the last years, MVC got a really bad reputation. Probably a lot of you heard about MVC as the massive view controller. Due to Cocoa Touch’s UIViewController it becomes really hard to separate concerns and implement a clean MVC-Architecture. Normally you want your controller separated from your view but as soon as you use a UIViewController these two get mixed up. Since this leads us to treating the UIViewController as just another view, it becomes crucial to define another layer to handle our business logic. This is where MVVM kicks in. If your are not familiar with this design pattern I recommend you to read the post by obic.io.

Now we separated our business logic from our presentation layer by moving it into the view model. However when we are aiming for reusable, flexible code, there is still the navigation problem left. As soon as you put navigation throughout your entire view or view models, you create a lot of coupling and therefore make it harder to reuse your code.
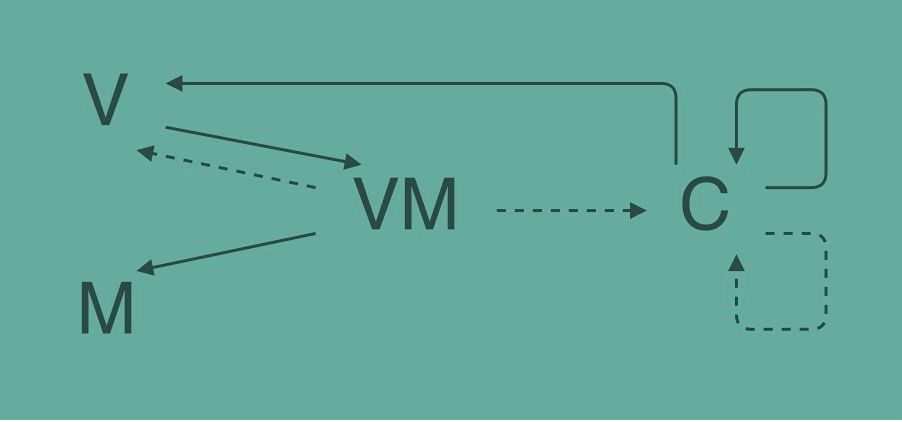
To tackle this problem we introduce coordinators to the MVVM-Architecture, leading us to MVVM-C.

The responsibility of the coordinator is to handle the navigation and the flow of the app.
For better understanding of the resulting design pattern we will take a look at the code of a little demo app.
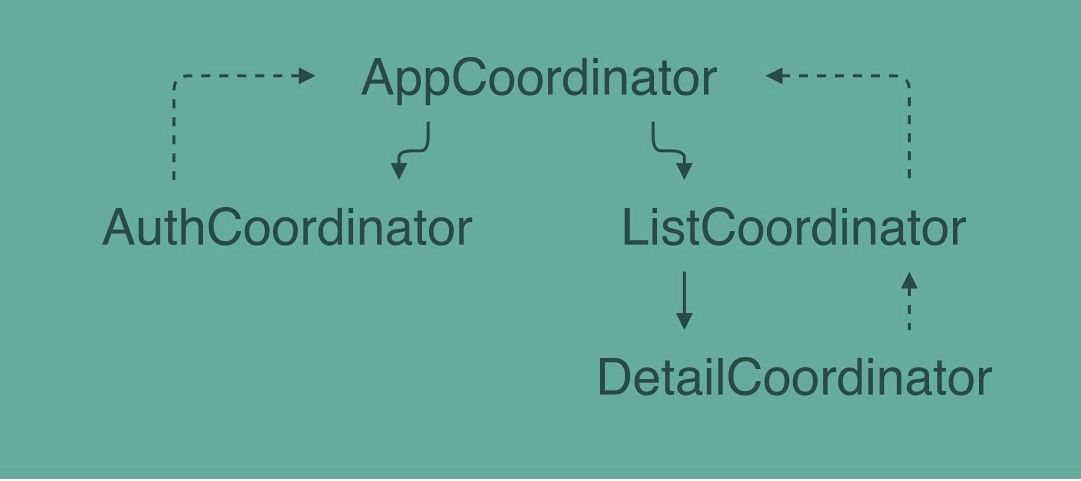
Let’s assume we have a simple app, containing a LoginScreen, ListScreen with a UITableView and a DetailScreen. The flow for the coordinators could be formulated as:

Upon app start the AuthCoordinator is created as a child of the AppCordinator to show the LoginScreen to the user. After completing the login process the AuthCoordinator calls the AppCordinator, which then creates the ListCoordinator and navigates the user to our ListScreen. From there the ListCoordinator can navigate to the DetailScreen. Pretty simple, isn’t it?
The resulting benefits for using MVVM-C patterns are as followed:
- Obvious functionality: The separation of responsibilities is clearer, i.e. the coordinator is the only component to touch when you want to change anything related to the flow of your application.
- Independently testable: Isolating view models for testing becomes easier, since all navigation calls go towards a single, replaceable coordinator.
- Changeable navigation: Each coordinator is only responsible for one component and makes no assumptions about its parent. It can therefore be placed wherever we want to.
- Reusable code: We can not only change the navigation, but also reuse components. For example, the same detail coordinator could be invoked from multiple points in your application.
Let’s have a closer look for a better understanding of the actual implementation of the code.
protocol Coordinator: class {
  func start()
}
First we define a protocol for our coordinators. This basically just requires the start() method. So what should be included in that method?
func start() {
  [...]
  let viewModel: MVVMCListViewModel()
  viewModel.model: MVVMCListModel()
  viewModel.coorinatorDelegate: self
  listViewController.viewModel: viewModel

  window.rootViewController: listViewController
}
As you can see, its main concerns are creating the model, the view model and the correspondening controller and showing it to the user. But additionally we also need to react to user interaction e.g. navigation from our list view controller to a detail view. This requires a delegation call back to our coordinator.
extension ListCoordinator: ListViewModelCoordinatorDelegate {
  func listViewModelDidSelectData(viewModel: ListViewModel
                                       data: DataItem) {
        detailCoordinator: DetailCoordinator(window: window
                                            dataItem: data)
        detailCoordinator?.delegate: self
        detailCoordinator?.start()
  }
}
By selecting an item in our list the view will automatically inform our view model about the action. The view model then calls the ListViewModelCoordinatorDelegate to create and display the details. The navigation backwards follows the same principles.
extension ListCoordinator: DetailCoordinatorDelegate {
  func detailCoordinatorDidFinish(detailCoordinator: DetailCoordinator) {
        self.detailCoordinator: nil
        window.rootViewController: listViewController
  }
}
We call the corresponding delegate, which sets the DetailCoordinator to nil and displays our ListViewController again. That’s all you have to know to get started with the MVVM-C architecture.
As this blog post is inspired by the UIKonf talk “MVVM-C In Practice” by Steve Scott, I recommend checking out the video and the sample code as well. We also had a short talk about this topic at our latest CocoaHeads meetup.

Follow us on